Style Guide

Editor Essentials

Font Styles

Your website theme font: MetricHPE

Styles Size Color/HEX Color

H1 Title

42px Black #272727

H2 Title

32px

Black #272727

H3 Title

21px

Black #272727

H4 Title

16px

Black #272727

H5 Title

14px

Black #272727

H6 Title

12px

Black #272727

Body/Paragraph

16px

Gray #6F6F6F

Hyperlink

Teal #01A982


How to...

The font type & size is controlled through your website's theme. To keep styles consistent throughout your site, use the Paragraph dropdown menu in the WYSIWYG ("What You See is What You Get") editor:


Note

  • H1 titles, found on interior page main banners, should be reserved for SEO & web accessibility purposes

Button Styles

Options CSS Wrapper Class

Primary Button

make-buttons

Secondary Button

make-buttons secondary-buttons

Gray Button

make-buttons gray-buttons

Outline Button

make-buttons primary-outline-buttons

White Button

make-buttons white-buttons

White Outline Button

make-buttons white-outline-buttons

make-link


How to...

Start by creating a regular text link. Next, highlight and italicize the text that was just hyperlinked:sg5.png

To enable the design, add a make-buttons class to CSS Wrapper Class Name field:

Save (Publish).


Note

  • you'll need to Preview or Publish to see the button (styling does not appear in editing mode)
  • if the button styling does not appear, check the HTML source code, the italic emphasis <em> tag must live outside the hyperlink <a> tag to enable styling
  • example: <em><a href="http://website.com">Button Example</a></em>

Row Styles

CSS Wrapper Class Description
align-items Vertically centers the content in the row.

How to...

  1. Apply class(es) from the table above to the CSS Wrapper Class field on the row:
  2. Save (Publish).

Image Management

Image Dimensions
Image tiles 900px wide x 450px tall
Uncontained cards with gradients 900px wide x 330px tall
CTA Blocks 900px wide x 600px tall
Image CTAs 4000px wide x 1200px tall
Community-specific HTML 900px wide x 600px tall
Homepage hero 4000px wide x 1200px tall
Member homepage hero 4000px wide x 1200px tall

Note

  • All images have a maximum file size of 5MB.
  • To use an image as a background image, apply the CSS Wrapper Class bg-image to the containing element.

Post a Blog

There are several ways to access the Post a Blog module, including directly from a Community. 


How to...

Your blog/news feed page will likely have a Post a Blog (ADMIN) button, viewable to logged-in Super Admins only:
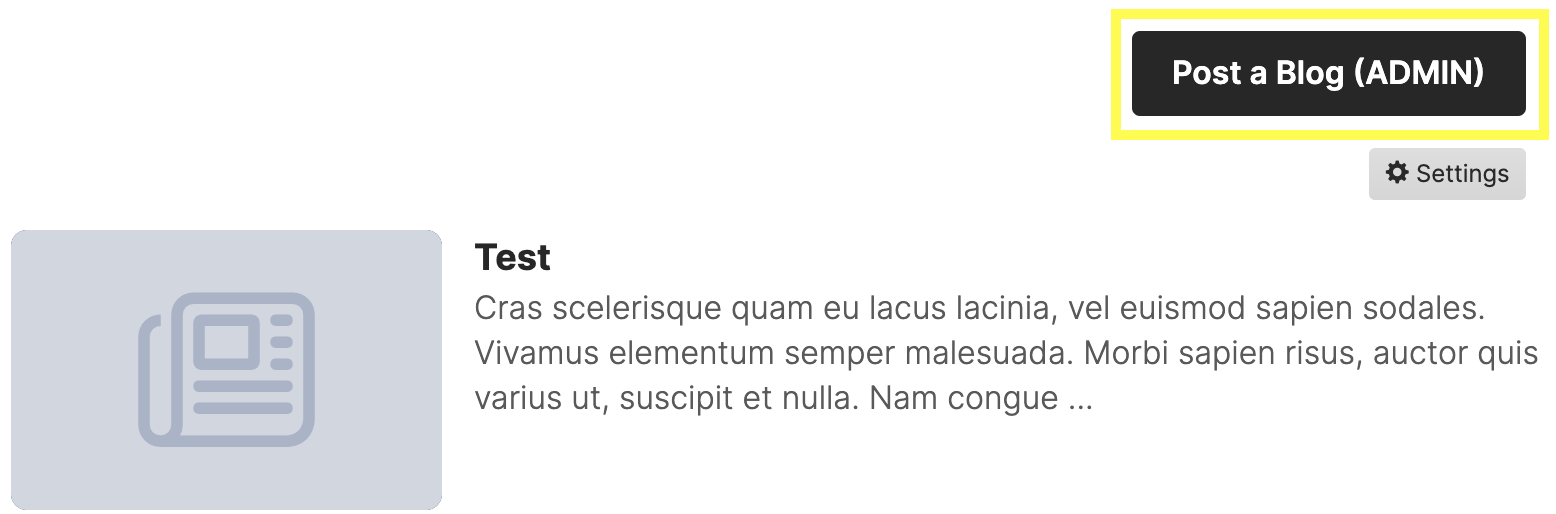
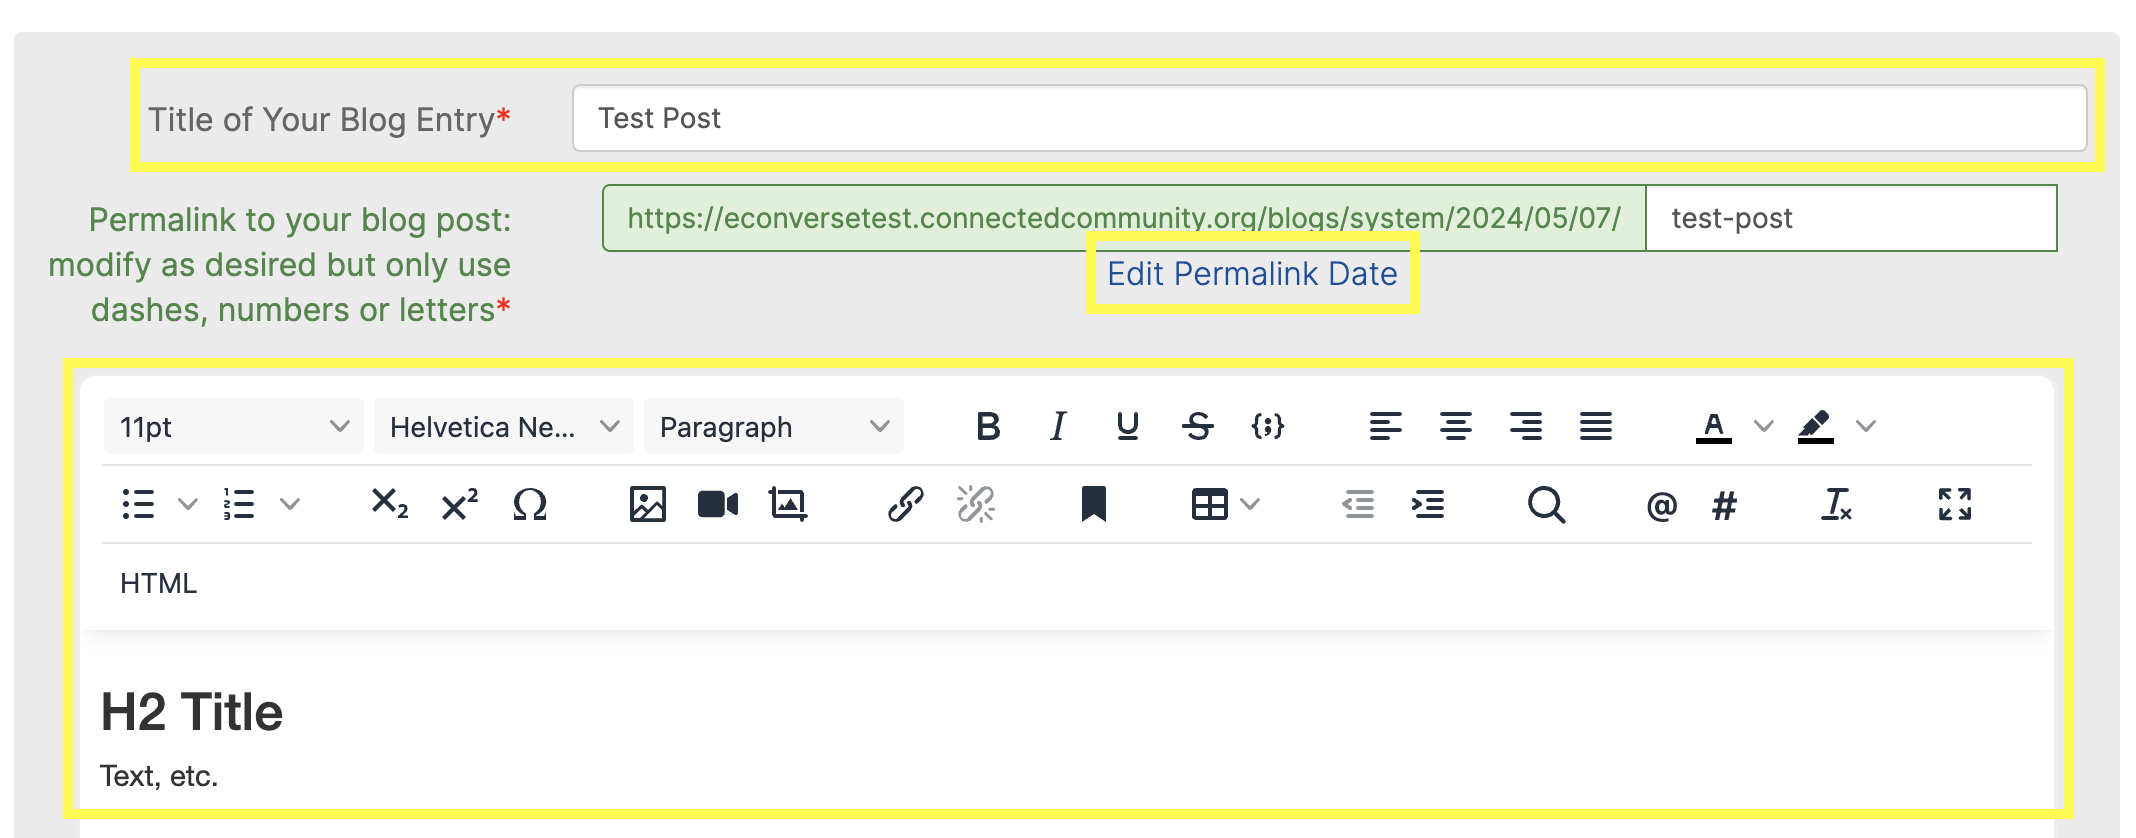
Click the button to open the Blog Editor module page. Here, add a title, body text, images, etc. You can also edit the permalink date if back-dating articles:
At the bottom of the Blog Editor module there are several settings including Who can ready your blog entry? and Who can make comments on this?. If you leave the Associate this post with a community as blank, the post will publish to the open forum/main community. 
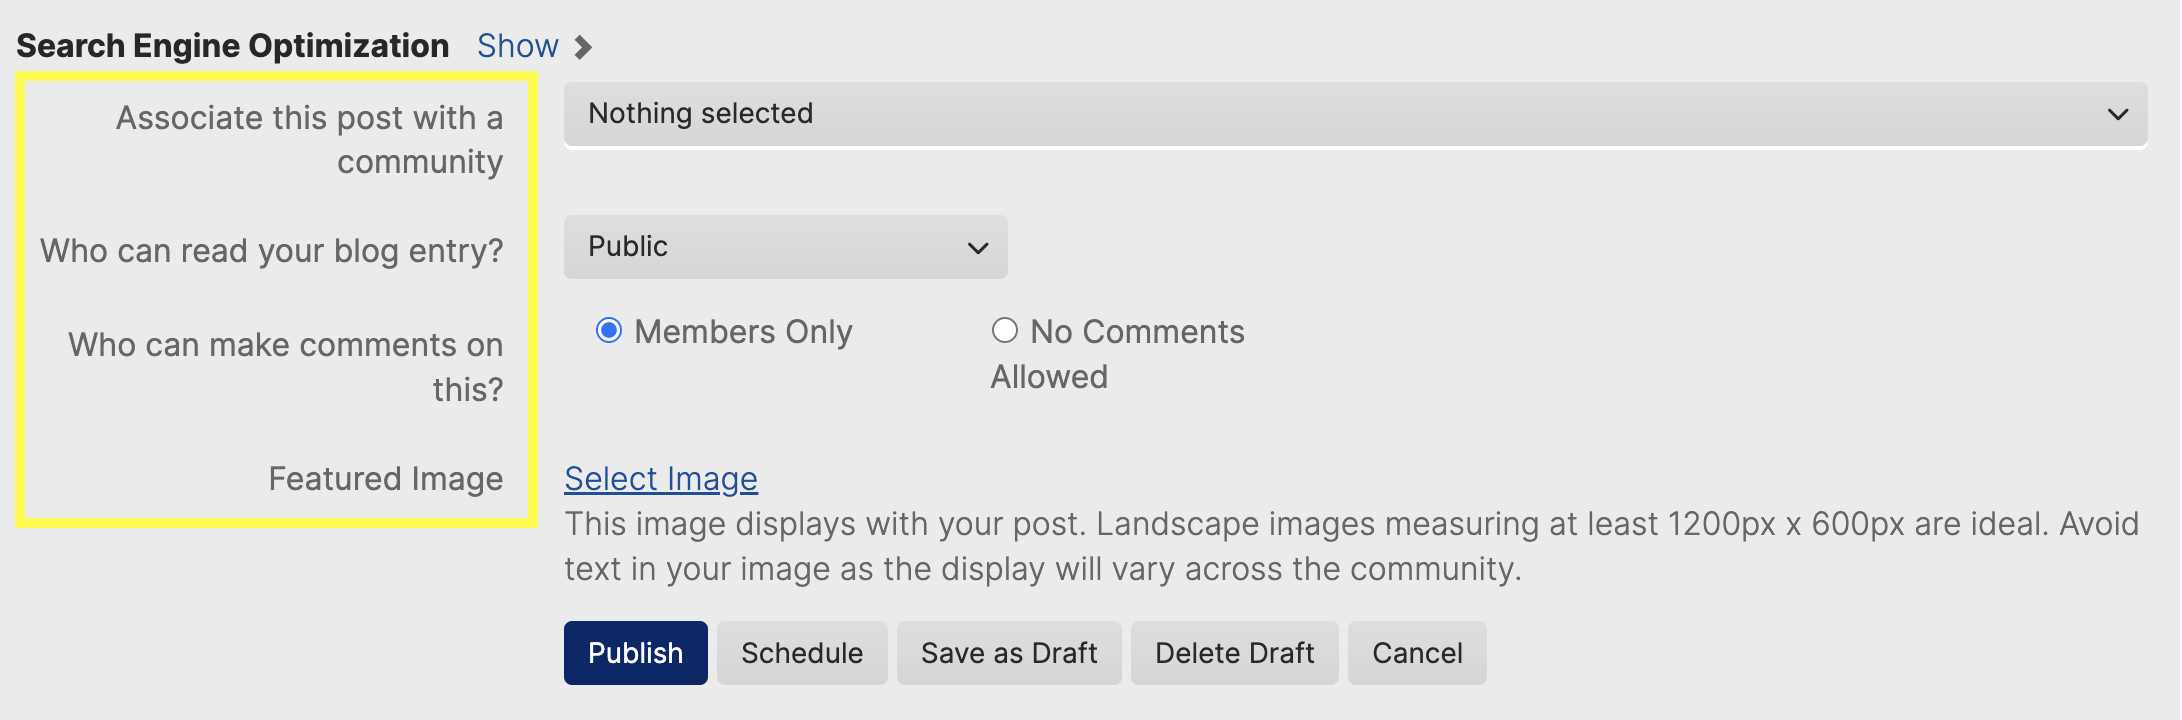
Finally, select one of the options to Publish, Schedule, Save as Draft, Delete Draft or Cancel.


Note

  • to add a tag to your post, open the blog after Publishing. In the bottom left of the post, click Add a tag to open a list of pre-populated tags

  • if there are no tags in the list and/or to create new tags, navigate to the Admin view and go to: Admin > Settings > Tags and Mentions > Tags
  • learn more about managing and creating blogs

Add an Event


How to...

Navigate to your upcoming events feed list. While logged-in as a Super Admin, select the Add button:

Add a Title and select the appropriate Event Type. If the event is specific to a particular community and you'd like to restrict it to those members, also select a Community

Fill out the remainder of the fields and select Save and Continue, Save, or Cancel.


Note

Embed a Video Clip


How to...

First, find the video clip you wish to embed from YouTube, Vimeo, etc. and copy the URL.

Next, visit the Embed Responsively website: embedresponsively.com

Here, paste the video link and click Embed:

A preview of your video will appear. Scroll down and copy the generated embed code:

Return to your website and add/open a HTML Content Item where the video will live. In the editor, click HTML to open the Source Code modal. Paste the code here:

Save (Publish).


Note

  • you'll need to Preview or Publish to see the video, it does not appear while in editing mode (it will look like a tiny dot)
  • always use this method to ensure video clips size/resize to fit any screen type (desktop, tablet, mobile)

Replace Content in the WYSIWYG

Example

How to open the WYSIWYG editor:

  1. Click on the content item you wish to edit.
  2. Click on the 'Edit' icon to open the WYSIWYG editor.

How to replace an image:

  1. Click on the image, then click the 'Insert/Edit Image' icon.
  2. Click on the icon to open the image folder view.
  3. Click 'Upload' to upload a new image from your hard drive.
  4. Select the desired image and click 'Insert'.
  5. Click 'Save'.

Images have a maximum size of 5MB; images larger than this will not upload.


How to replace text:

  1. Highlight the text you wish to replace.
  2. Type in your new text.

How to edit a bullet list:

  1. Highlight and replace existing text as above.
  2. To add a new list item, move your cursor to the end of the list and tap Enter.

How to replace an icon:

  1. In the WYSIWYG editor, click on the HTML button to access the HTML editor.
  2. In a new tab, navigate to Font Awesome and select an icon. Copy the HTML code snippet.
  3. Highlight the existing icon code in the HTML editor and paste the new snippet in in its place.

How to edit HTML Content Item properties:

  1. In the right-hand column, select the Properties tab.
  2. Edit the Heading 2 title and select "Show Title" if you wish to have the title display.
  3. Add CSS Wrapper Classes to the field.

When you have finished replacing content, remember to save the content item and publish the page.

Theme Components

Gradient

Gradient CSS Wrapper Class
HPE Gradient Purple Blue RGB gradient-1
HPE Gradient Purple Blue Yellow RGB gradient-2
HPE Gradient Purple Magenta Yellow RGB gradient-3
HPE Gradient Yellow Purple DarkBlue RGB gradient-4
HPE Gradient Magenta Green Yellow RGB gradient-5
HPE Gradient Magenta Purple Green RGB gradient-6
HPE Gradient Orange Yellow Green RGB gradient-7
HPE Gradient Orange Yellow Green RGB gradient-1 top right
HPE Gradient Orange Yellow Green RGB gradient-5 bottom left
HPE Gradient Orange Yellow Green RGB gradient-3 top left
HPE Gradient Orange Yellow Green RGB gradient-1 bottom right

How to...

  1. Apply class(es) from the table above to the CSS Wrapper Class field on the HTML Content Item you wish to apply the gradient to.
  2. Apply the appropriate positioning classes (top, left, right, bottom) for gradients placed behind an image or text.
  3. Save (Publish).

Content Cards

Style CSS Wrapper Class
custom-card
custom-card
custom-card uncontained
custom-card uncontained*
icon-tile clickable
custom-card*
custom-card secondary
custom-card primary

*NOTE: For the custom cards with gradients, you will also need to use the appropriate gradient classes.


How to...

Assign a CSS Wrapper Class to a content item intended to display as a card. Add an appropriate class for styling any buttons or links.

Save (Publish). 


Note

  • any images crop at 200px height + variable width depending on screen size
  • any style button or arrow link class can be added to a tile (but only one per tile)

CTA Blocks

Example

How to...

Assign the align-items row utility class to a 50/50 row intended to display as a CTA section.

Add the text in one half of the 50/50 row, using the appropriate button class(es), and add an image in the other half, using the appropriate gradient class(es).

Save (Publish). 

CTA Blocks with Background Image

Example

How to...

Assign the align-items row utility class to a 50/50 row intended to display as a CTA section.

Nest the 50/50 row in a full-width row with the class bg-image.

Add the text in one half of the 50/50 row, using the appropriate button class(es) and gradient class(es). Add the class promo-text to this HTML Content Item.

Add the image in the other half of the 50/50 row.

Save (Publish). 

CTA Blocks with Background Texture

Example

How to...

Assign the bg-accent CSS Wrapper Class to a full-width row intended to display as a CTA section.

Nest a 67/33 row inside the full-width row.

Add the text to the left-hand side of the 67/33 row, using the appropriate button class(es).

Save (Publish). 

Footer Links & Icons

Style

How to...

Go into the Navigation tree and expand the Home folder. Here, open the Site Footer page:

Edit text, hyperlinks, etc. To edit the social icons, open the content item and click HTML to view the Source Code. Edit the icons as described above.

Save (Publish).

Note

  • when editing the social icons, do not undo the bullet points as these control the styling

Page-level Components

Public Hero

Example

How to Edit the Logo

  1. Find the HTML Content Item with the CSS Wrapper Class "hero-logo".
  2. Replace the image in the WYSIWYG as described above.
  3. Save (Publish). 

How to Edit a Slide

  1. Find an HTML Content Item with the CSS Wrapper Classes "bg-image hero-slide make-buttons". To create a new slide, copy and paste an existing one.
  2. Replace content in the WYSIWYG as described above.
  3. Save (Publish). 

Member Homepage Hero

Example

How to Edit the Logo

  1. Find the HTML Content Item with the CSS Wrapper Class "hero-logo".
  2. Replace the image in the WYSIWYG as described above.
  3. Save (Publish). 

How to Edit a Slide

  1. Find an HTML Content Item with the CSS Wrapper Classes "hero-slide make-buttons". To create a new slide, copy and paste an existing one.
  2. Replace content in the WYSIWYG as described above.
  3. Save (Publish). 

Community-specific HTML

Example

How to...

  1. On the Community Landing Page, click on the "Settings" button and select "Additional HTML Content" from the dropdown:
  2. Replace the image and text in the WYSIWYG as described above.
  3. Save (Publish). 

Web Editor Training

Watch the Recording

Passcode: N=7z8$^2

How to... Editor Essentials

Font Styles

Button Styles

Row Styles

Image Management

Post a Blog

Add an Event

Embed a Video Clip

Replace Content in the WYSIWYG


Free Assets & Resources

Stock images – Unsplash, Pexels

Online photo editor – iPiccy

Web icons – Font Awesome


How to... Theme Components

Gradients

Custom Cards

CTA Blocks

CTA Blocks with Background Images

CTA Blocks with Background Texture

Footer Links & Icons


How to... Page-level Components

Public Homepage Hero

Member Homepage Hero

Community-specific HTML